Selecting Your Chapter / Page Options
 Selecting Your Chapter / Page Options
![]() Edit / Preview Page
Edit / Preview Page
The 'Edit / Preview' button will enable you to open a template file for editing. Simply click on the file to highlight and then on the ![]() button, or right click to select the icon. You can also double-click on the file to edit.
button, or right click to select the icon. You can also double-click on the file to edit.
![]() Editing Your Chapter / Page Titles
Editing Your Chapter / Page Titles
The page names that appear within your eBook's document structure, such as your 'Chapter' names, will appear within your eBook's 'Table of Contents.'
You can edit your page names by clicking on the '![]() Chapter' or '
Chapter' or '![]() Page' to highlight and then on the
Page' to highlight and then on the ![]() button to edit. You can also right click to locate the 'Edit Name' option.
button to edit. You can also right click to locate the 'Edit Name' option.
![]() Placing Your Pages in Order
Placing Your Pages in Order
If you're using your own files to create your eBook, you will need to place your files in a specific order. Your opening page must be in the first position, followed by the next page within your eBook and so on.
However, if you're using a template, the only files you'll need to place in order are your '![]() Chapters' and '
Chapters' and '![]() Pages,' as your book cover must be in the first position and your back cover must be in the last.
Pages,' as your book cover must be in the first position and your back cover must be in the last.
If your template has an 'Introduction,' this page should be in the second position, followed by your 'Foreword.' Your '![]() Chapters' and '
Chapters' and '![]() Pages' should then follow the 'Foreword.'
Pages' should then follow the 'Foreword.'
You can place your files in order a few different ways:
- Click on the file you'd like to move and then on the
 or
or  button to move the file to your desired position.
 - Click and hold your left mouse button on the file you'd like to move and drag the file to your desired position.
- Click on the file you'd like to move to highlight, right click on your mouse and then on the or button to move the file to your desired position.
This step is very important, as it will determine what page should load when your eBook is opened and what pages will be displayed when using the 'Prior,' 'Next,' 'First' and 'Last' buttons within your eBook's toolbar.
![]() Adding a New Chapter
Adding a New Chapter
You can add new '![]() Chapters' to your eBook project.
Chapters' to your eBook project.
Click on the 'Project' tab to view your eBook's files. Click on the file (to highlight) to specify where the new '![]() Chapter' should be added. Click on the
Chapter' should be added. Click on the ![]() button to add a new '
button to add a new '![]() Chapter' (See the 'Adding New Pages' section for instructions on adding new pages within your chapter.).
Chapter' (See the 'Adding New Pages' section for instructions on adding new pages within your chapter.).
![]() Adding a New Sub Chapter
Adding a New Sub Chapter
You can add new '![]() Sub Chapters ' to your eBook project.
Sub Chapters ' to your eBook project.
Click on the 'Project' tab to view your eBook's files. Click on the '![]() Chapter' (to highlight) to specify where the new '
Chapter' (to highlight) to specify where the new '![]() Sub Chapter' should be added. Click on the '
Sub Chapter' should be added. Click on the '![]() Insert chapter' button and then on the '
Insert chapter' button and then on the '![]() Add a sub chapter' to add a new '
Add a sub chapter' to add a new '![]() Sub Chapter.' (See the 'Adding New Pages' section for instructions on adding new pages within your '
Sub Chapter.' (See the 'Adding New Pages' section for instructions on adding new pages within your '![]() Sub Chapter.')
Sub Chapter.')
![]() Deleting a Chapter / File
Deleting a Chapter / File
You can delete a '![]() Chapter' or '
Chapter' or '![]() Page' within your eBook project.
Page' within your eBook project.
Click on the 'Project' tab to view your eBook's files. Click on the '![]() Chapter' or '
Chapter' or '![]() Page' you would like to delete (to highlight) and then on the
Page' you would like to delete (to highlight) and then on the ![]() icon.
icon.
![]() Adding a New Page
Adding a New Page
You can add new '![]() Pages' to your eBook project.
Pages' to your eBook project.
Click on the 'Project' tab to view your eBook's files. If you'd like to add a page within a '![]() Chapter,' click on the '
Chapter,' click on the '![]() Chapter' to highlight and then on the '
Chapter' to highlight and then on the '![]() Add Default Page' arrow and select the page you would like to add. Repeat this process for each page you'd like to add.
Add Default Page' arrow and select the page you would like to add. Repeat this process for each page you'd like to add.
![]() Clearing the Story Tree
Clearing the Story Tree
You can clear an entire 'Story Tree' (delete all the files) within your eBook project.
Click on the 'Project' tab to view your eBook's files. Click on the ![]() button to remove them.
button to remove them.
![]() Page Properties
Page Properties
To select your page properties, click on each file and select your options within the 'Page Properties' window at the bottom of the 'Project' window.
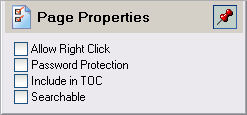
Selecting Your Right Click Options - You can disable/enable the right mouse click option within each individual pages of your eBook.
Click on the 'Options' button on the toolbar. Click on the 'Security' tab and go to the 'Allow Right Click.' Select the 'Custom' option and click on 'OK.'
Click on the 'Project' tab to view your files. To enable the right mouse click within certain files, click on each '![]() Page' to highlight, and place a check by the 'Allow Right Click' option within the 'Page Properties' section.
Page' to highlight, and place a check by the 'Allow Right Click' option within the 'Page Properties' section.
Password Protecting Individual Files - You can password protect the pages of your choice within your eBook.
Click on the 'Options' button on the toolbar then on the 'Security' tab. Select the 'Password' option and type in a universal password. Under the 'Password Protection Type' select the 'Selected Pages' option and click on 'OK.'
Click on the 'Projects' tab and then on each '![]() Page' you'd like to protect and place a check by the 'Password Protection' option within the 'Page Properties' section.
Page' you'd like to protect and place a check by the 'Password Protection' option within the 'Page Properties' section.
Defining Your Table of Contents - You can decide which pages you'd like to have displayed within your eBook's 'Table of Contents.'
Click on the '![]() Chapters' and/or '
Chapters' and/or '![]() Pages' you'd like to include to highlight, and place a check by the 'Include in TOC' option within the 'Page Properties' section (Make sure you edit your '
Pages' you'd like to include to highlight, and place a check by the 'Include in TOC' option within the 'Page Properties' section (Make sure you edit your '![]() Chapter' and/or '
Chapter' and/or '![]() Page' names within your story tree, as these titles will be displayed within your TOC).
Page' names within your story tree, as these titles will be displayed within your TOC).
Selecting Individual File Search Preferences - You can select the pages you would like to enable your readers to search.
Click on each '![]() Page' you'd like to be searchable to highlight, and place a check by the 'Searchable' option within the 'Page Properties' section.
Page' you'd like to be searchable to highlight, and place a check by the 'Searchable' option within the 'Page Properties' section.