Creating a Template eBook Using the 'New Project' Button
 Creating a Template eBook Using the 'New Project' Button
This method of creating an ebook will require that you create your ebook manually (without the step by step wizard).
![]() Starting Your Project
Starting Your Project
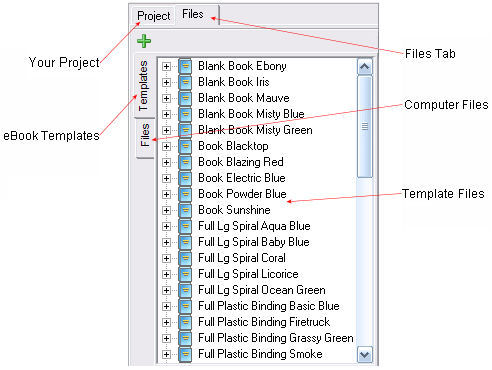
Your first step in creating your new eBook will be to click on the 'New Project' icon on the eBook Starter toolbar. This will open the 'Files Window.'
Next, click on the top 'Files' tab and select the 'Templates' tab on the left to view the templates -- they will be displayed within the 'Files Window.'
Files Window:
![]() Previewing the Templates
Previewing the Templates
To preview the templates, click on the '![]() Template Name' -- a thumbnail image of the template will be displayed below the file window.
Template Name' -- a thumbnail image of the template will be displayed below the file window.
![]() Previewing the Template Files
Previewing the Template Files
To preview each individual file, double-click on the '![]() Template Name' to display the files. Click on each file -- one by one -- to highlight, and then on the
Template Name' to display the files. Click on each file -- one by one -- to highlight, and then on the ![]() icon to preview. The file will be displayed within the 'Preview' window. You can also reach the 'Preview' option by right clicking on your mouse.
icon to preview. The file will be displayed within the 'Preview' window. You can also reach the 'Preview' option by right clicking on your mouse.
![]() Selecting a Template
Selecting a Template
To select a template for your project, click on the '![]() Template Name' to highlight, and then on the
Template Name' to highlight, and then on the ![]() to add the template to your project. Your template should now be displaying within your 'Project' window.
to add the template to your project. Your template should now be displaying within your 'Project' window.
![]() Creating Your Story Tree
Creating Your Story Tree
Once your selected template is displaying within your 'Project' window, you can begin setting up your ebook's story tree. A story tree is simply the structure of your ebook. For example, your ebook's story tree might begin with the Front Cover, which will be the first page displayed when your ebook is opened, and end with the Back Cover, which will be the last page displayed. All of the other pages between the Front and Back Cover are your ebook's pages.
For example, if you've selected a template with an Introduction, this page may be in your story tree's second position, which means it will be the second page displayed within your ebook. If your template has a Table of Contents, this page may be in your story tree's third position, which means it will be the third page displayed within your ebook.
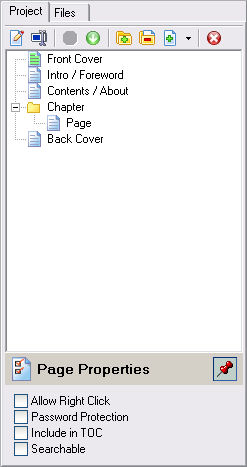
Here's how your 'Project' window might look:
To create your story tree, simply click on the '![]() Insert Chapter' button to add a '
Insert Chapter' button to add a '![]() Chapter.' A new '
Chapter.' A new '![]() Chapter' will be added each time you click on the button.
Chapter' will be added each time you click on the button.
If you'd like to add a '![]() Sub Chapter' within a chapter, click on your chapter to highlight and then on the '
Sub Chapter' within a chapter, click on your chapter to highlight and then on the '![]() Add Sub Chapter' button at the top of the 'Project' window.
Add Sub Chapter' button at the top of the 'Project' window.
To add '![]() Pages' to your chapters, click on the chapter in which you'd like to add a page to highlight and then on the '
Pages' to your chapters, click on the chapter in which you'd like to add a page to highlight and then on the '![]() Add Default Page' arrow and select the page you would like to add. Repeat this process for each chapter.
Add Default Page' arrow and select the page you would like to add. Repeat this process for each chapter.
Here's how your chapters, sub chapters and pages might look:
Please note, the purpose of chapters is to enable you to display your chapter titles within your Table of Contents and to enable you to keep your ebook files organized -- that's it. If you'd rather not include them, you certainly don't have to, as you can elect to have your 'Page' titles display in the Table of Contents as well.
You can set your story tree up however you'd like. However, make sure you place your files in the order in which you would like them to be viewed when your ebook is opened.
![]() Working with Your Files
Working with Your Files
Once you've set up your story tree, your next step will be to select your '![]() Chapter' and '
Chapter' and '![]() Page' options. This might include all of the following:
Page' options. This might include all of the following:
- Edit/Preview Your Pages - Click on the
 button to edit and/or preview your '
 Pages' within the editor. (Editing option available for use with templates only)
 - Editing Your Chapter / Page Titles - Click on the
 button to edit your '
 Chapter' and 'Page' titles.
 - Placing Your Pages in Order - Click on the

 buttons to place your 'Pages' in order -- beginning with your opening 'Page.'
 - Adding a New Chapter - Click on the
 button to add a new 'Chapter' and/or 'Sub Chapter.'
 - Deleting a Chapter / File - Click on the
 button to delete a 'Chapter' or 'Page.'
 - Adding a New Page - Click on the
 arrow to select and add a new 'Page.' (For use with templates only)
 -
Clearing the Story Tree - Click on the
 button to clear the entire story tree. Note: Use this option with care, as it will delete your entire ebook.
To select your page properties, click on each file and select your options within the 'Page Properties' window at the bottom of the 'Project' window.
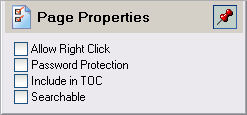
- Selecting Your Right Click Options - To allow users to use their right click mouse menu, click on each 'Page' and place a check by the 'Allow Right Click' option within the 'Page Properties' section (This function is only available if you've selected the 'Custom' right click option within the 'Options' - 'Security' section -- step five within the wizard).
- Password Protecting Individual Files - To password protect individual pages, click on each 'Page' and place a check by the 'Password Protection' option within the 'Page Properties' section (This function is only available if you've selected 'Password' - 'Selected Pages' under 'Security Type' within the 'Options' - 'Security' section -- step five within the wizard).
- Defining Your Table of Contents - To specify which 'Chapters' and/or 'Pages' should display within your TOC, click on each 'Chapter' and/or 'Page' and place a check by the 'Include in TOC' option within the 'Page Properties' section. (For use with templates only)
- Selecting Individual File Search Preferences - To specify which 'Pages' should be searchable within your ebook, click on each 'Page' and place a check by the 'Searchable' option within the 'Page Properties' section.
For additional information on selecting your '![]() Chapter' and/or '
Chapter' and/or '![]() Page' options, visit the 'Selecting Your Chapter / Page Options' section.
Page' options, visit the 'Selecting Your Chapter / Page Options' section.
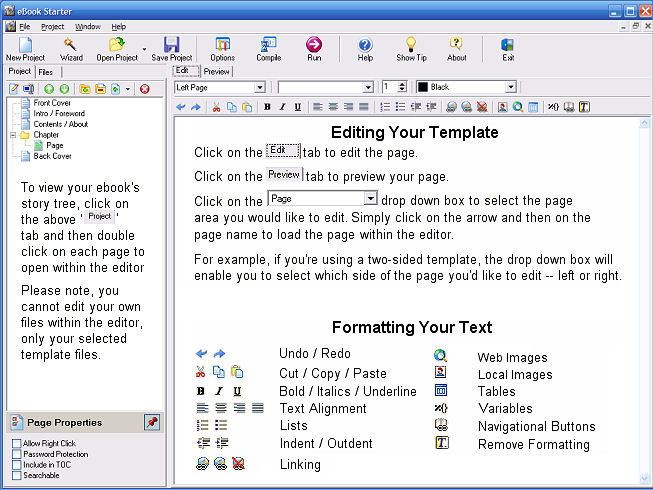
![]() Editing Your Templates
Editing Your Templates
Once you've completed the above steps, you're now ready to start editing your files. To do so, click on the 'Project' tab to view your files and then double click on the first file to begin editing. The file should open within the editor. You can also click on the file to highlight and then on the '![]() ' button.
' button.
Please note, you cannot edit files that have been created in another program. Only the original eBook Starter template pages may be edited within the editor. If you try to open a file created in another program within the editor, all you will see is the 'Preview' screen. However, the editor will not appear.
For further information, visit the 'Editing Your Templates' section.
Note: Your Table of Contents will automatically be created according to the options you selected within your 'Project' window.
![]() Customizing Your eBook's Settings
Customizing Your eBook's Settings
Once you're finished working with your files, your next step will be to customize all of your eBook's options. This will include all of the following:
- Selecting Your eBook's Options (Go to 'Project' - 'Options' or click on the 'Options' button on the eBook Starter toolbar) - Select options, such as General, Security, Toolbar, and Splash.
- Customizing Your eBook's Toolbar Buttons (Go to 'Project' - 'Toolbar' on the eBook Starter toolbar and click on the 'Buttons' tab) - Select and edit your eBook's toolbar buttons.
- Customizing Your eBook's Toolbar Bookmarks (Go to 'Project' - 'Toolbar' on the eBook Starter toolbar and click on the 'Bookmarks' tab) - Select and edit your eBook's bookmarks.
- Working with Variables (Go to 'Project' - 'Variables' on the eBook Starter toolbar) - Scan your template for variables.
- Editing Your System Pages (Go to 'Project' - 'System Pages' on the eBook Starter toolbar ) - Edit your eBook's system pages, such as About, Shareware and Password Protection pages. Please note, portions of your system pages, such as your ebook title, will automatically be included when you edit the variables within the 'Variables' section. For further information on variables, visit the 'Working with Variables' section.
![]() Compiling Your eBook
Compiling Your eBook
When you've finished editing your eBook and selecting your options, your final step will be to compress your files into the EXE eBook format. This procedure is better known as compiling your eBook.
You can compile your eBook in one of two ways:
- Click on the 'Compile' icon on the toolbar.
- Go to 'Project' - 'Compile' on the toolbar.
A 'Confirm' window will appear displaying all of the options you have selected for your eBook. Read through the options to ensure the settings are correct. If you need to make some changes, click on 'No.' If you're ready to compile your eBook, click on 'Yes.'
![]() Uploading Your eBook to Your Server
Uploading Your eBook to Your Server
When you've completed your eBook, your next step will be to upload your new eBook to your server. To do so, you'll need to either use an FTP program or your 'Control Panel' through your web host. If you're not familiar with File Transfer Protocol, click here for a tutorial.
Your eBook should be uploaded to your server in 'Binary' mode.
Make sure you upload the correct file. Your ebook will have the filename you selected within the 'Options' section (Step 3 within the Wizard) -- followed by an EXE extension. So, for example, if you called your ebook dog_grooming, your filename would be dog_grooming.exe.
When you create an ebook, the system creates a folder that contains your ebook's files (template, text, images, etc.), a folder that contains your ebook's system files (toolbar buttons, logo, variables, etc.), your ebook's project file and your actual ebook file.
If you called your ebook dog_grooming, here's what these folders and files will be called:
- dog_grooming.files (template, text, images, etc.)
- dog_grooming.system (toolbar buttons, logo, variables, etc.)
- dog_grooming.ebp (ebook settings)
- dog_grooming.exe (your ebook)
The only file you'll need to upload to your server is your ebook.
 Creating a Download Page
In order for your customers to download your eBook, you will need to create a 'Thank you' web page, also known as a 'Download' page. This page is simply a web page that includes some brief instructions in regard to downloading your eBook and a download link.
If you're using a payment processor, such as ClickBank or PayPal, to enable you to accept payment through your web site, they will ask you for the web address of your 'Thank you' page. This is the page your customers will be taken to once they complete their purchase.
To create a download link on your 'Thank you' page, most servers will allow you to simply link to the web address like this:
| <A HREF="http://www.yourdomain.com/ebook.exe">Download</A> |
Edit the text indicated in red to suit your needs. The link address must lead to your ebook file on your web server.
If this method of linking doesn't work for you, contact your server administrator for assistance.
In addition to including a download link you should also include the following note:
Please note: If you have an older operating system, including Windows 95, 98 or ME, or have upgraded from an older system, you will need to download and install a free Microsoft Windows Script Control plug-in to utilize the latest technologies included within this ebook.Download Problems:(1) If you're using a firewall program, such as Personal Firewall™, Gauntlet™ or ZoneAlarm™, this may also prevent you from downloading and opening the ebook file. You may need to disable the program until you complete your download.
|

HTML Code:
| Please note: If you have an older operating system, including Windows 95, 98 or ME, or have upgraded from an older system, you will need to download and install a free Microsoft <A HREF="http://www.microsoft.com/downloads/details.aspx?FamilyId=D7E31492-2595-49E6-8C02-1426FEC693AC&displaylang=en"> Windows Script Control </A>plug-in to utilize the latest technologies included within this ebook.<BR> <BR> <H3 ALIGN=Center> Download Problems: </H3> <P> (1) If you're using a firewall program, such as Personal Firewall™, Gauntlet™ or ZoneAlarm™, this may also prevent you from downloading and opening the ebook file. You may need to disable the program until you complete your download.<BR> <BR> (2) If you're using an anti-virus program, such as Norton™ or McAfee™, you may need to disable the program until you complete your download.<BR> <BR> (3) If you have recently upgraded to Windows XP SP2, you may be prevented from downloading the ebook. To start the download, you must first click on the Internet Explorer Information Bar, and then on 'Download File' to begin the download. |
If you're in need of a quality web host, Host4Profit is a professional web hosting company specifically designed for the Internet marketer. You can also find a wealth of quality web site templates at Template Monster.
Step by Step
-
Click on the 'New Project' icon on the toolbar.
-
Click on the top 'Files' tab and then on the side 'Templates' tab.
-
Click on the '
 Template Name' to preview. Double-click on the ' Template Name' to display the files, and then on the
  icon to preview each file.
 -
Click on the '
Template Name' to highlight, and then on the  to add your selected template to your 'Project' window.
 -
Click on the 'Project' tab to view your project and create your story tree. Click on the '
Insert Chapter' button to add a 'Chapter.' If you'd like to add a 'Child Chapter' within a chapter, click on your chapter to highlight and then on the ' Add Child Chapter' button. To add 'Pages' to your chapters, click on the chapter in which you'd like to add a page to highlight and then on the ' Add Default Page' arrow and select the page you would like to add.
 -
Select your '
Chapter' and 'Page' options. Click on each 'Chapter' or 'Page' and click on the mini toolbar icons at the top of the 'Project' screen to select your preferred options. -
Click on the 'Project' tab to view your files and then double click on each file to begin editing.
-
Customize your ebook's settings -- Click on 'Project' - 'Variables' to edit the variables. Click on 'Project' - 'Toolbar' to edit the toolbar. Click on 'Project' - 'System Pages' to edit your About, Shareware and Password Protection pages. Click on 'Project' - 'Options' to edit your General, Security, Toolbar, and Splash screen options.
-
Click on the 'Compile' icon on the toolbar to compress your files into the EXE ebook format.
-
Upload your new eBook to your server.
-
Create your download page.