Quick Start Guide to Creating Your eBook
 Quick Start Guide to Creating Your eBook
If you're anxious to get started and really don't want to dig through all of the individual in-depth instructions to learn how to create your eBook, this section is for you. Skip down to the Getting Help section to begin.
If you would like in-depth instructions for each option you can use to create an ebook, please follow the links below. Otherwise, you can skip this section and move on to the Getting Help section.
![]() Creating a Template eBook Using the Wizard
Creating a Template eBook Using the Wizard
![]() Creating a Template eBook Using the 'New Project' Button
Creating a Template eBook Using the 'New Project' Button
![]() Creating an eBook with Your Own Files Using the Wizard
Creating an eBook with Your Own Files Using the Wizard
![]() Creating an eBook with Your Own Files Using the 'New Project' Button
Creating an eBook with Your Own Files Using the 'New Project' Button
![]() Backing Up Your Project Files
Backing Up Your Project Files
Due to Windows updates and other updates running in the background causing problems when running software programs on your computer, it is HIGHLY recommended that you make back up copies of your project files.
To make a back up copy of your project, open your project and go to 'File' - 'Save Project As,' give your project a different name, such as backup_project, and save it to a different location.
The Windows updates have been known to completely crash software programs and computer systems. If the Windows update caused the eBook Starter software to crash, you would lose any portion of your project that you had been working on, or even your entire project, as the software wouldn't have had a chance to save your work.
Do this each time you make any changes. You might also want to save your files onto a CD, DVD or even another hard drive.
![]() How to Copy and Paste
How to Copy and Paste
When you begin creating your ebook, you will either need to type your text into the template pages or copy and paste your text from another source into the pages. For this reason, it is important that you know how to copy and paste.
Your first step will be to place your mouse pointer over the beginning of the text you would like to copy.
Next, click and hold your left mouse button and drag your mouse over all the code you would like to copy (Example of highlighted text). Your code should now be highlighted.
Go to 'Edit' - 'Copy' on your web browser's toolbar and then place your cursor where you would like to place the text. Right click on your mouse and go to 'Paste.' Your text should now be displayed.
If you are unable to go to 'Edit' - 'Copy' on your web browser's toolbar, place your mouse pointer over the highlighted text, right click on your mouse and go to 'Copy.' To paste your text, place your cursor where you would like your text to appear, right click on your mouse and go to 'Paste.' Your text should now display.
![]() Creating Your eBook
Creating Your eBook
Following is a complete step by step guide to creating your ebook - from start to finish:
![]() Selecting a Template for Your Project
Selecting a Template for Your Project
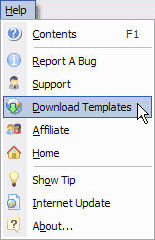
Your first step will be to visit the 'Download Templates' page to download any new or updated templates that may be available. On the eBook Starter toolbar, click on the text 'Help' option and then on 'Download Templates.'
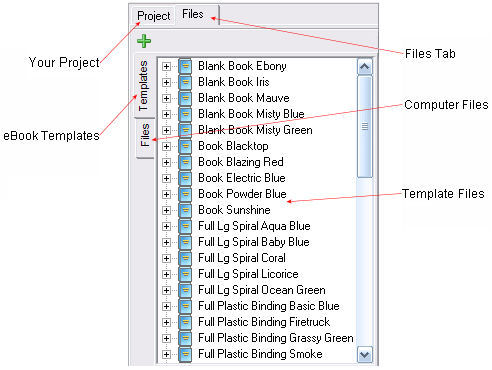
Once you've downloaded and installed the new templates (installation instructions will be found on the download page), your next step will be to select a template for your project. On the eBook Starter toolbar, click on the 'New Project' button. The 'Project' and 'Files' window will load.
eBook Starter Toolbar:
![]()
New Project Button:
![]()
Project and Files Window:
![]() Previewing the Templates
Previewing the Templates
Once the 'Project' and 'Files' window loads, you will see two tabs at the top - 'Project' and 'Files.' Click on the 'Files' tab. All of the templates will now be displayed. Click once on each filename to preview each template within the preview window on the right. To view what pages are available with each template set, double click on the filename - the pages will be displayed.
![]() Adding a Template to Your Project
Adding a Template to Your Project
Your next step will be to select the template you'd like to use and add it to your project. To do so, click once on the filename to highlight, and then on the '![]() ' sign at the top of the 'File' window. Your selected template should now be displaying within the 'Project' window.
' sign at the top of the 'File' window. Your selected template should now be displaying within the 'Project' window.
![]() Building Your Story Tree
Building Your Story Tree
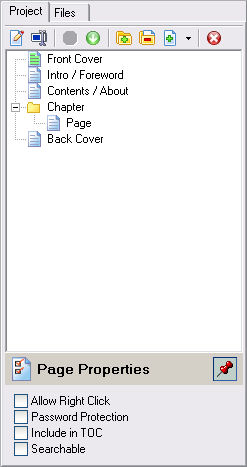
Once you have added a template to your project, click over to the 'Project' tab, as shown below, to view your template pages.
Your next step will be to begin building your story tree. A story tree is the structure of your ebook, which will include all of your ebook's chapters and pages. The order in which you place your pages within your story tree is the order the pages will display within your ebook. For this reason, make sure you always leave the default template pages, such as the Front Cover, Introduction, Foreword and other pages in the top positions.
To begin building your story tree, click on the page name within your project, where you would like to add a new page. The new page will be added directly below your selection. Click on the '![]() Add Default Page' icon for each page you'd like to add.
Add Default Page' icon for each page you'd like to add.
Project Window:
![]() Renaming Your Pages
Renaming Your Pages
Your next step will be to rename all of your pages, if needed. To do so, click on the page to highlight, right click on your mouse and go to 'Edit Name.' Type a new name for your page. If you elect to display your page within the 'Table of Contents,' (depending on your selected template) these are the names that will be displayed.
![]() Selecting Your Page Properties
Selecting Your Page Properties
Once you've finished renaming your pages, your next step will be to click on each page and select your 'Page Properties' at the bottom of the screen.
Page Properties:
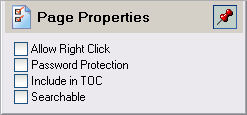
Note: You can choose to display or hide the 'Page Properties' window by clicking on the red thumb tack.
Allow Right Click - Select this option to specify which pages you would like to allow your readers to use their right mouse click menu option. However, to use this option, you must also select the 'Custom' option within the 'Allow Right Click' security section ('Options - Security').
Password Protection - Select this option to specify which pages should be password protected. However, to password protect individual pages, you must also specify that you would like to password protect 'Selected Pages' within the 'Protect Type' security section. ('Options - Security').
Include in TOC - Select this option if you would like to include the selected '![]() Chapter' or '
Chapter' or '![]() Page' within your Table of Contents. However, this option is only valid if your selected template includes a Table of Contents page - not all of the templates do.
Page' within your Table of Contents. However, this option is only valid if your selected template includes a Table of Contents page - not all of the templates do.
Searchable - Select this option if you would like your page to be searchable. However, this option is only valid if you also include the 'Search' button within your ebook's toolbar ('Project - Toolbar').
![]() Editing Your Template Pages
Editing Your Template Pages
Once you have added your template to your project and selected all of your page properties, your next step will be to begin editing your templates.
Scanning Your Pages for Variables
Your first step will be to scan your pages for 'Variables.' ('Project' - 'Variables') Variables are powerful little codes that can be used within your eBooks for customization purposes.
All of the templates contain variables that will automatically display your information within your ebooks, such as your copyrights, the year, your company name, etc., simply by filling in your variable preferences within the 'Variables' screen.
Example Variables Window:
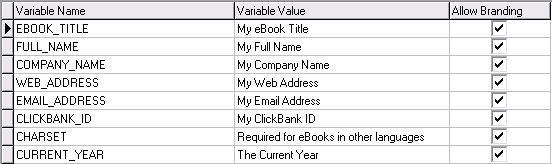
When you scan your pages for variables, all of the variables found within your pages will be displayed within the 'Variable Name' section.
You can edit these variables by typing in the values within the 'Variables Value' section.
For further information, visit the 'Working with Variables' section.
![]() Opening Your Pages Within the Editor
Opening Your Pages Within the Editor
To begin editing your pages, double click on each page within your 'Project' window.
Project Window:
The page will open within the editor.
eBook Editor:
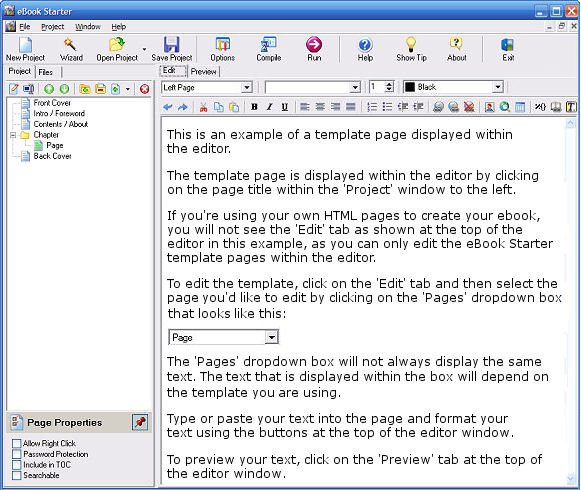
If you're using a two sided template, you can select which side of the page you would like to edit by clicking on the 'Pages' drop down box right below the 'Edit' and 'Preview' tabs. It will look something like this:
![]()
Please note: The 'Pages' drop down box will not always display the same text. The text that is displayed within the box will depend on the template you are using.
The 'Pages' drop down box displays each section within a single page that may be edited. For example, if you open a page within an opened book style template, you will find two sections within a single page -- left page and right page. To edit the left page, click on the 'Pages' drop down box and select 'Left Page.' To edit the right page, select 'Right Page.'
For additional information on editing your templates, see the 'Editing Your Templates' section.
Please note: Your copyright information will be displayed according to the information you type within the variables section. For example, the copyright code at the bottom of each page is displayed like this:
Copyright © %{COMPANY_NAME} %{CURRENT_YEAR} All Rights Reserved
Once you type in your information within the variables screen, the %{COMPANY_NAME} code will be replaced with your company name and the %{CURRENT_YEAR} code will be replaced by the current year.
![]() Selecting Your Ebook's Options
Selecting Your Ebook's Options
Your next step will be to select your ebook's options, which will include General (ebook title, icon, display setting, etc.), Security (password protection, right click options, etc.), Toolbar (button size, caption, placement, colors, etc.), and Splash (starting and ending options) options. To do so, click on the 'Options' button on the eBook Starter toolbar and then on the options tab of your choice.
Options Button:
![]()
For further information, visit the 'Selecting Your eBook's Options' section.
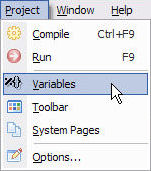
![]() Building Your Ebook's Toolbar
Building Your Ebook's Toolbar
In order for your readers to navigate your ebook, you will most likely want to include a toolbar. To build your toolbar, which will require you to select which buttons you would like to include, go to 'Project' - 'Toolbar.' For further information, visit the 'Customizing Your eBook's Toolbar Buttons' section.
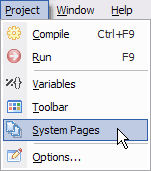
![]() Setting Up Your Ebook's System Pages
Setting Up Your Ebook's System Pages
Your next step will be to set up your ebook's system pages, such as the 'About' page. To do so, go to 'Project' - 'System Pages.' For further information, visit the 'Editing Your System Pages' section.
![]() Saving Your Project
Saving Your Project
To save your project so that you can edit your ebook in the future, click on the 'Save Project' button on the eBook Starter toolbar.
Save Project Button:
![]()
![]() Compiling Your eBook
Compiling Your eBook
To compile your files into the ebook format, click on the 'Compile' button on the eBook Starter toolbar.
For further information, visit the 'Compiling Your eBook' section.
Compile Button:
![]()
![]() Distributing Your eBook
Distributing Your eBook
When you have completed your eBook, your next step will be to decide how you would like to distribute your ebook - Internet download, CD or email.
![]() Internet Download
Internet Download
The easiest and best way to distribute your ebook is to upload it to your web server and enable your customers to download your ebook via a download page you create. However, this will require you to have a web host, FTP (File Transfer Protocol) software installed on your computer and a web site.
| If you're in need of a quality web host, HostGator is a professional web hosting company specifically designed for the Internet marketer. If you're not familiar with FTP, see the FTP section for additional information. If you would like to use a pre-designed web site template instead of designing your web site from scratch, you can find a wealth of quality web site templates at Template Monster. |
For further information on creating a download page, visit the 'Creating a Download Page' section.
Note: Due to anti-virus and/or firewall programs blocking EXE software files, prior to uploading your ebook to your server, it is HIGHLY recommended that you place your ebook file within a ZIP file for distribution. Not only will this eliminate this problem, but it will also compress the file and shorten the download time.
If you're not familiar with ZIP files, visit the Zip file section for additional information.
![]() CD
CD
If you'd like to distribute your ebook on CD, visit the 'Tips and Tricks' section for additional information.
![]() Email
Email
If you're considering sending your ebooks through email, as ebooks can have very large file sizes and many anti-virus and/or firewall programs will block EXE files, we really don't recommend this.
However, if you must, it is highly recommended that you place your ebook file within a ZIP file and send it as a file attachment.
![]() What File Shall I Distribute?
What File Shall I Distribute?
When you create an ebook, the eBook Starter software creates a folder that contains your ebook's files (template, text, images, etc.), a folder that contains your ebook's system files (toolbar buttons, logo, variables, etc.), your ebook's project file (enables you to edit your ebook in the future), and your actual ebook file.
So, for example, if you saved and compiled your ebook as dog_grooming, here's what these folders and files will be called:
- dog_grooming.files (template, text, images, etc.)
- dog_grooming.system (toolbar buttons, logo, variables, etc.)
- dog_grooming.ebp (ebook settings)
- dog_grooming.exe (your ebook)
The only file you'll need to give to your customers is your ebook. The other files are used by the eBook Starter software only.